Maintaining your bicycle is crucial for both performance and safety. One of the most critical aspects of this maintenance is replacing the disc brake pads. Worn-out brake pads can significantly compromise your ability to stop safely, making regular checks and replacements vital.
Replacing disc brake pads might seem daunting, but with the right guidance, it’s a task that can be accomplished at home. This not only saves you money but also gives you a deeper understanding of your bicycle’s mechanics. By taking control of bicycle maintenance, you’re ensuring your safety on the road and enhancing your overall cycling experience.
Key Takeaways
- Regularly check your disc brake pads for wear to ensure safety.
- Replacing disc brake pads is a DIY-friendly task with the right tools and guide.
- Proper bicycle maintenance enhances your cycling experience and safety.
- DIY bike repair saves money and increases your understanding of your bicycle.
- Safety should always be your top priority when cycling.
Understanding Disc Brake Systems
For cyclists, understanding disc brake systems is key to maintaining their bicycles and ensuring safety on the road. Disc brakes have become a standard feature on many bicycles due to their superior performance in various weather conditions.
What Are Disc Brakes?
Disc brakes are a type of braking system that works by applying friction to a rotor attached to the wheel hub. When the brake lever is squeezed, it activates a caliper that clamps the brake pads onto the rotor, slowing down the wheel. This system provides superior stopping power and modulation compared to traditional rim brakes.
Advantages of Disc Brakes
One of the primary advantages of disc brakes is their ability to perform consistently in wet and muddy conditions, where rim brakes may fail. Additionally, disc brakes offer better modulation, allowing cyclists to control their speed more precisely. They also reduce the wear on the wheel rims, as the braking force is applied directly to the rotor rather than the rim.
Common Types of Disc Brakes
There are mainly two types of disc brake systems: hydraulic and mechanical. Hydraulic disc brakes use fluid pressure to activate the caliper, offering powerful and smooth braking. Mechanical disc brakes, on the other hand, use a cable to actuate the caliper. Both types have their advantages, with hydraulic systems generally providing more stopping power and mechanical systems offering easier maintenance and adjustment.
Understanding the type of disc brake system on your bicycle is crucial for effective disc brake replacement and maintenance. Regular checks and adjustments can significantly enhance your cycling experience, providing safer and more controlled rides. By following cycling tips related to brake maintenance and ensuring proper brake pad alignment, cyclists can enjoy the full benefits of their disc brake systems.
Tools You Will Need
Before diving into the process of changing your bicycle disc brake pads, it’s essential to gather the necessary tools. Having the right equipment on hand will make the process smoother and more efficient, ensuring a successful DIY bike repair experience.
Essential Tools for Brake Pad Replacement
To replace your disc brake pads, you’ll need a few critical tools. First, a tire lever or a similar tool is necessary for pushing back the caliper pistons. This is a crucial step that requires care to avoid damaging the brake system. You’ll also need an Allen wrench to remove the retaining pin that holds the brake pads in place. Additionally, new brake pads compatible with your disc brake system are a must. Ensure you purchase pads that are specifically designed for your brake type to guarantee optimal performance and safety.
- Tire lever or a similar tool for pushing back caliper pistons
- Allen wrench for removing the retaining pin
- New brake pads compatible with your disc brake system
Optional Tools That Can Help
While not mandatory, certain tools can significantly ease the brake pad installation process. A repair stand can be incredibly helpful, as it allows you to work on your bicycle at a comfortable height, reducing strain on your back and improving visibility. Additionally, having a clean rag and some isopropyl alcohol can be useful for cleaning the brake caliper and rotor, ensuring a clean environment for the new brake pads.
- Repair stand for comfortable working height
- Clean rag for cleaning
- Isopropyl alcohol for degreasing
By having these tools ready, you’ll be well-prepared to tackle the bicycle maintenance task at hand, ensuring a safe and effective brake pad replacement process.
Safety First: Preparing Your Workspace
Preparing a safe and organized workspace is the first step in successfully replacing your bicycle’s disc brake pads. A well-prepared workspace not only enhances your safety but also makes the entire process more efficient, allowing you to focus on the task at hand.
Find a Safe Location
Choosing the right location for your workspace is crucial. Ideally, you should work in a well-lit, dry area that is free from distractions. Ensure that your bicycle is positioned on a stable surface, such as a workbench or a dedicated bike repair stand, to prevent any accidents.
Gather Necessary Supplies
Gathering all the necessary tools and supplies before starting the job is essential. This includes your new brake pads, the required tools for the replacement process, and any cleaning materials you might need. Having everything within reach will save you time and reduce the risk of mistakes.
- New brake pads compatible with your disc brake system
- Allen wrench for removing the wheel and brake caliper
- Torx driver for certain brake pad retention systems
- Cleaning materials for the brake system
Wear Protective Gear
Wearing protective gear is a simple yet effective way to safeguard yourself against potential injuries. Gloves can protect your hands from cuts and abrasions, while safety glasses can shield your eyes from debris or chemical splashes.
| Tool/Supply | Description |
|---|---|
| New Brake Pads | Compatible with your bicycle’s disc brake system |
| Allen Wrench | For removing the wheel and brake caliper |
| Torx Driver | For certain brake pad retention systems |
| Gloves | Protects hands from cuts and abrasions |
| Safety Glasses | Protects eyes from debris or chemical splashes |
Checking Your Current Brake Pads
Before you start replacing your bicycle’s disc brake pads, it’s crucial to assess their current condition. This step ensures you’re not unnecessarily replacing parts or missing a critical maintenance task. Checking your brake pads is a simple yet vital process that can significantly impact your bike’s performance and safety.
Signs That Your Brake Pads Need Replacement
There are several indicators that your brake pads may need to be replaced. If you notice any of the following signs, it’s time to take a closer look:
- Reduced braking performance: If your bike takes longer to stop or the brakes feel spongy, it could be a sign that the brake pads are worn out.
- Unusual noises: Squealing, grinding, or other unusual sounds when applying the brakes can indicate worn or contaminated brake pads.
- Visible wear: Inspecting the brake pads visually can reveal if they’re worn down or damaged.
Paying attention to these signs can help you identify when your brake pads need replacement, ensuring your bike remains safe to ride.
Measuring Brake Pad Thickness
To accurately determine if your brake pads need replacement, measuring their thickness is essential. Here’s how to do it:
- Locate the brake pads: Identify the brake pads in your disc brake system.
- Measure the thickness: Use a caliper to measure the thickness of the brake pad material. Compare this to the manufacturer’s minimum thickness specification.
- Compare with manufacturer’s specs: If the measured thickness is below the minimum recommended by the manufacturer, it’s time to replace the brake pads.
Regularly checking and maintaining your brake pads can enhance your bike’s braking performance and overall safety. By understanding how to change bike brake pads disc and checking the brake pad condition, you can ensure a smoother and safer ride.
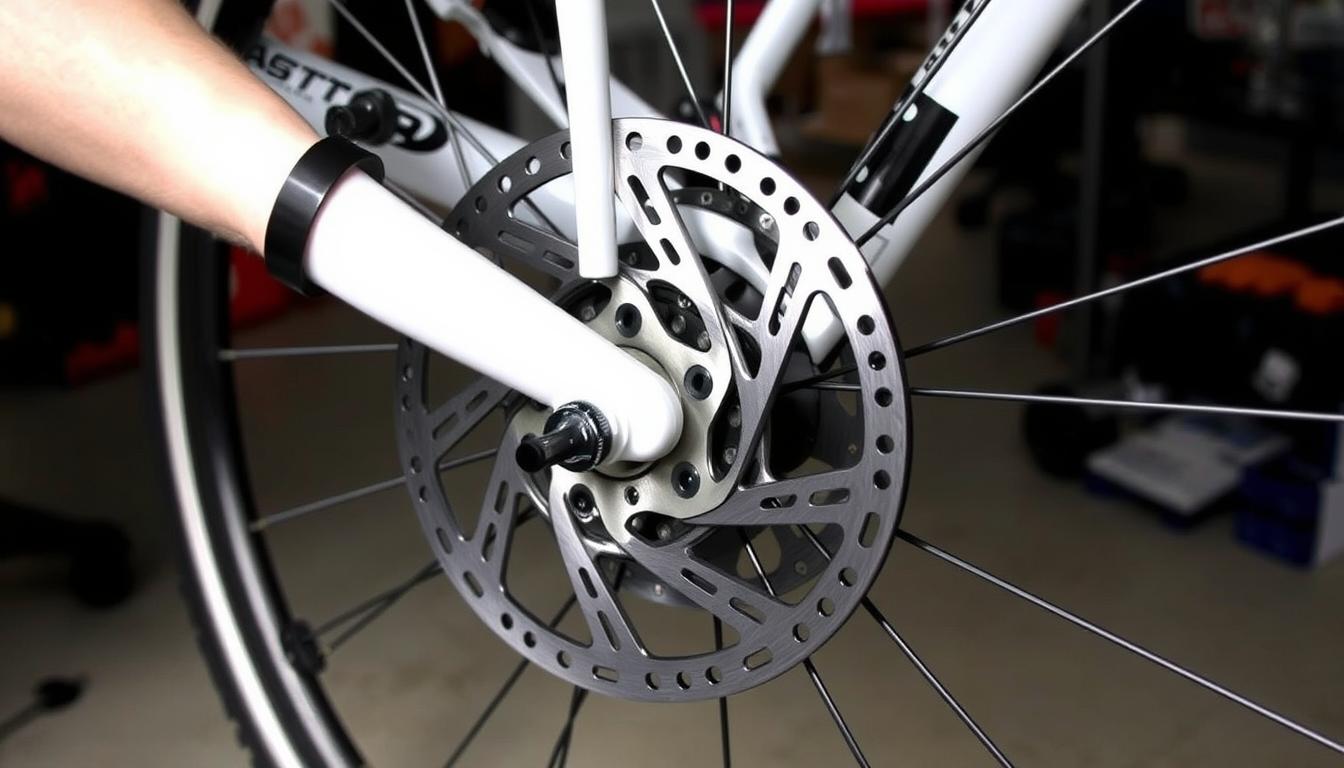
Removing the Wheel
To access the brake pads, start by safely removing the wheel from your bicycle. This step is crucial in the bicycle repair tutorial process, as it allows you to inspect and replace the brake pads if necessary.
Safely Removing Your Bicycle Wheel
Before you begin, ensure your brakes are released. For mechanical disc brakes, this usually involves opening the caliper or releasing the brake cable tension. For hydraulic disc brakes, you may need to push the pistons back or release the lever.
- Shift your gear to the smallest cog or chainring to minimize the chain’s interference.
- Release the quick release lever or loosen the nuts holding the wheel in place.
- For quick release wheels, flip the lever open. For bolt-on wheels, loosen the nuts but do not remove them yet.
- Gently pull the wheel off the axle. If it’s stuck, check that the quick release is fully open or that the nuts are sufficiently loosened.
Tips for Avoiding Damage
When removing the wheel, be careful not to damage the brake rotor or the wheel itself. Here are some tips to keep in mind:
- Avoid touching the brake rotor with your bare hands, as the oils from your skin can contaminate it.
- Be gentle when handling the wheel to prevent scratching or bending.
- If your wheel is stuck, do not force it. Instead, check your quick release or nuts again.
| Wheel Type | Removal Steps | Common Issues | ||
|---|---|---|---|---|
| Quick Release | 1. Open the quick release lever. | 2. Pull the wheel off. | Wheel might be stuck if the lever is not fully open. | |
| Bolt-On | 1. Loosen the nuts. | 2. Remove the nuts and washers. | 3. Pull the wheel off. | Nuts might be over-tightened, requiring more effort to loosen. |
By following these steps and tips, you can safely remove your bicycle wheel as part of a bicycle repair tutorial, ensuring a smooth process for replacing your brake pads.
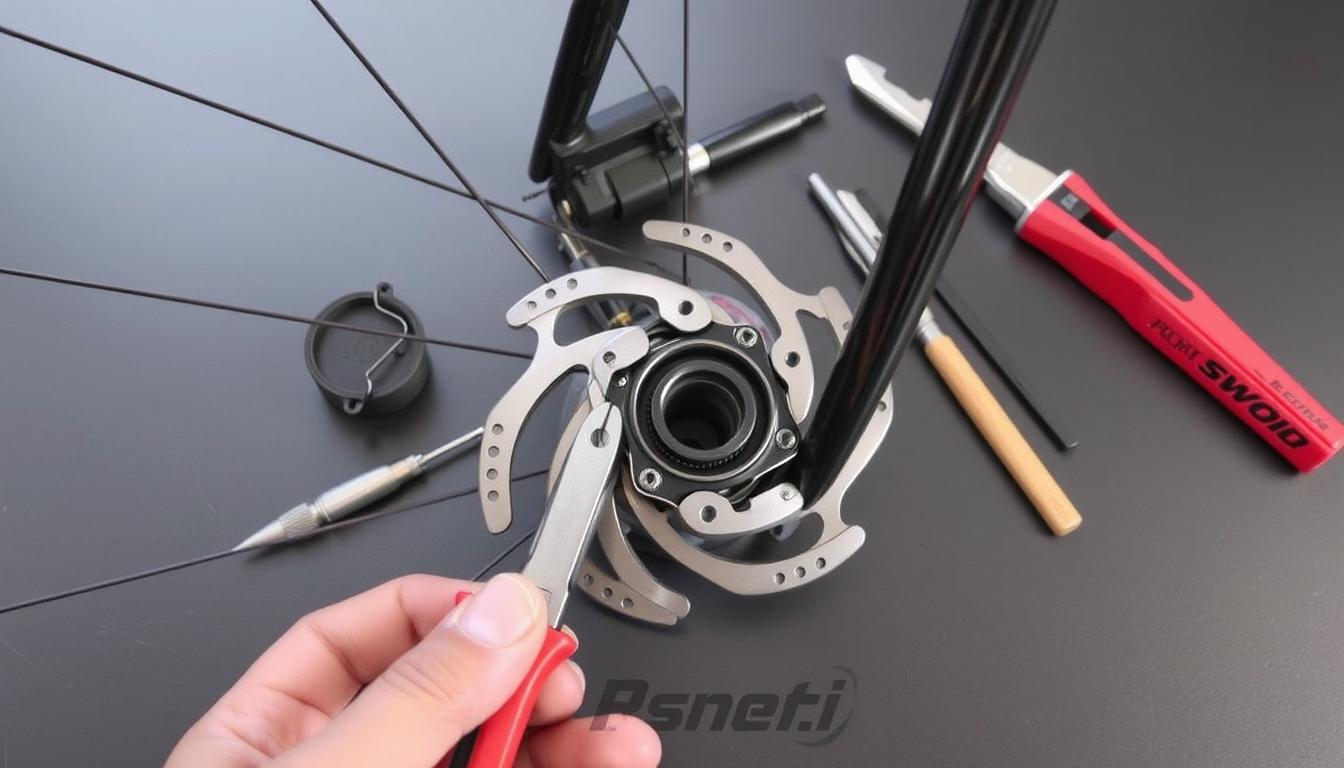
Removing Old Brake Pads
To replace your bicycle’s brake pads, you’ll first need to remove the old pads, a task that involves understanding the retention system used by your brakes. This step is crucial for ensuring that your braking system functions properly after the replacement.
Identifying the Brake Pad Retention System
The retention system is what keeps the brake pads in place. Common systems include retaining pins, clips, or sometimes a combination of both. It’s essential to identify the type of retention system your brakes use before attempting to remove the old pads. Consult your bicycle’s manual or manufacturer’s website if you’re unsure.
Step-by-Step Removal Process
Once you’ve identified the retention system, you can proceed with removing the old brake pads. Here’s a general step-by-step guide:
- Release the retention mechanism. This might involve pulling out a pin or releasing a clip.
- Gently pull out the old brake pads. Be mindful of any springs or spacers that might be attached.
- Take note of the orientation of the old pads and any other components. This will be helpful when installing the new pads.
Be cautious during this process to avoid damaging the brake caliper or other components. If you encounter any resistance, stop and reassess the situation to avoid causing any damage.
After successfully removing the old brake pads, you’re ready to proceed with installing the new ones, ensuring your bicycle’s braking system is restored to optimal performance.
Installing New Brake Pads
Replacing your bicycle’s brake pads with new ones is a crucial step in maintaining your bike’s safety and performance. As you move forward with this process, it’s essential to select the right replacement pads and follow a step-by-step installation guide to ensure your brakes function properly.
Selecting the Right Replacement Pads
Choosing the correct brake pads for your bicycle is vital. Different brake systems require specific types of pads. For instance, if your bike is equipped with SRAM brakes, you’ll need to replace the pads with SRAM-compatible ones. Always check your bike’s manual or manufacturer’s website to find out the recommended pad type for your specific brake system.
When selecting replacement pads, consider factors such as riding conditions, pad material, and compatibility. “The right brake pads can significantly enhance your bike’s stopping power and overall safety,” as noted by cycling experts.
Step-by-Step Installation Guide
Once you have the correct replacement pads, follow these steps for installation:
- Push back the caliper pistons: Use a piston reset tool or a flathead screwdriver to gently push the pistons back into the caliper. Be cautious not to damage the pistons or the caliper.
- Insert the new pads: Align the new brake pads with the caliper, ensuring they are properly seated.
- Secure the pads: Follow the manufacturer’s instructions to secure the new pads in place. This may involve using a retaining clip or bolt.
After installing the new brake pads, test your brakes to ensure they are functioning correctly. Adjust the brake settings as necessary to achieve optimal performance.
“Proper brake pad installation is key to maintaining your bicycle’s braking performance and ensuring your safety on the road or trail.”
By following these steps and selecting the right replacement pads, you can confidently maintain your bicycle’s brake system and enjoy a safer ride.
Reassembling Your Bicycle
With the new brake pads in place, you can now focus on putting your bicycle back together. This step is crucial to ensure your bike is safe to ride and functions properly.
Reinstalling the Wheel
To reinstall the wheel, start by aligning the wheel with the dropouts on your bicycle frame. Make sure it’s properly seated before tightening the nuts or quick-release mechanism.
- For nuts, tighten them in a star pattern to ensure even pressure.
- If your bike has a quick-release mechanism, make sure it’s securely tightened by flipping the lever.
Ensuring Everything is Tightened Properly
After reinstalling the wheel, check that all parts are tightened properly. This includes the brake caliper, any bolts or screws that were loosened during the brake pad replacement process, and the wheel itself.
- Double-check the brake caliper is aligned with the rotor and securely fastened.
- Verify that the wheel is centered and tightened according to the manufacturer’s instructions.
- Test the brakes gently to ensure they’re functioning correctly before taking your bike for a ride.
By following these steps, you’ll ensure your bicycle is reassembled correctly and ready for safe use. Remember, regular maintenance is key to prolonging the life of your bicycle’s components.
Testing Your Brakes
After replacing your bicycle’s disc brake pads, it’s crucial to test your brakes to ensure they’re functioning correctly. This step is vital for your safety on the road.
How to Safely Test Your Brake Performance
To test your brakes safely, find a flat, dry area away from traffic. Start by riding your bicycle at a moderate speed and then apply the brakes gently but firmly. Listen for any unusual noises and pay attention to how the bicycle responds.
If the brakes feel spongy or the bicycle pulls to one side, you may need to adjust the brake settings. Proper brake function is key to safe riding.
Adjusting the Brake Settings
Proper brake pad alignment is crucial for effective braking. Check that the brake pads are aligned with the rotor and not touching it when the brakes are not applied.
To adjust the brake settings, follow these steps:
- Loosen the brake caliper mounting bolts.
- Align the brake pads with the rotor.
- Tighten the mounting bolts securely.
- Test the brakes again to ensure proper function.
| Brake Issue | Possible Cause | Solution |
|---|---|---|
| Brakes feel spongy | Air in brake lines or worn brake pads | Bleed brake lines or replace brake pads |
| Bicycle pulls to one side when braking | Misaligned brake caliper | Adjust brake caliper alignment |
Maintenance Tips for Longevity
To keep your bicycle’s disc brakes in top condition, regular maintenance is crucial. Proper care can significantly extend the longevity of brake pads.
Regular Checks and Cleaning
Regular checks are essential to identify wear and tear early on. Clean the brakes regularly to prevent dirt and grime from accumulating and causing damage. When cleaning, avoid using harsh chemicals that can damage brake components. Instead, use a soft brush and mild soap to gently remove dirt.
Avoiding Common Mistakes
Some common mistakes can drastically reduce the life of your brake pads. Avoid contaminating the pads with oils or greases, as this can compromise their effectiveness. Be mindful of your brake pads’ condition and replace them when necessary.
By following these simple bicycle maintenance tips, you can ensure your brakes continue to function optimally, enhancing your safety on the road and extending the longevity of brake pads.
FAQ
What are the signs that my bicycle disc brake pads need to be replaced?
Signs that your brake pads need replacement include a decrease in braking performance, visible wear on the pads, or if the pad thickness is below the manufacturer’s minimum specification.
How do I know which type of brake pads are compatible with my disc brake system?
To find the right replacement pads, you need to match the pad type to your brake system. Check your brake manufacturer’s documentation or the manufacturer’s website for compatibility information.
Can I replace my bicycle disc brake pads without removing the wheel?
Generally, removing the wheel is necessary to access the brake pads. However, some brake systems may allow for pad replacement without wheel removal; check your brake manufacturer’s instructions.
What tools are required to change disc brake pads on a bicycle?
Essential tools include a tire lever or similar tool for pushing back the caliper pistons, an Allen wrench for removing the retaining pin, and new brake pads compatible with your system.
How do I push back the caliper pistons when installing new brake pads?
Use a tire lever or a similar tool to gently push the caliper pistons back into their housing. Be careful not to damage the pistons or the caliper.
What is the proper way to clean my disc brakes?
Clean your disc brakes by wiping the rotors with a clean cloth and brake cleaner. Avoid contaminating the brake pads or rotors with oils, greases, or other substances.
How often should I check my brake pads for wear?
Regularly inspect your brake pads for wear, ideally every few months or before long rides. Check the pad thickness and look for signs of wear or damage.
Can I reuse the old brake pad retaining pin or clip?
It’s generally recommended to use new retaining pins or clips when replacing brake pads, as the old ones may be worn or damaged.
How do I test my brakes after installing new pads?
Test your brakes in a safe environment, such as an empty parking lot, by applying the brakes at various speeds to ensure they’re functioning correctly and evenly.
What are some common mistakes to avoid when replacing disc brake pads?
Common mistakes include contaminating the brake pads or rotors, not properly securing the retaining pin or clip, and not testing the brakes after installation.
How can I extend the life of my brake pads?
Regular maintenance, such as cleaning the brakes and checking pad wear, can help extend the life of your brake pads. Avoiding contamination and ensuring proper brake alignment also contribute to longevity.